🌟 What Makes This Device Special
The RF433-MQTT-SNIFFER is a professional-grade 433MHz signal monitoring device with built-in web interface and Home Assistant integration. Key highlights:
- Mesh Networking - Unique feature for RF devices! Connect multiple units to extend coverage across your entire property. One Master collects signals from all Satellites.
- Professional CC1101 Transceiver - Industrial-grade RF module with adjustable sensitivity, spectrum analyzer, and multi-protocol support (EV1527, PT2262, HT6P20).
- Zero-Configuration Home Assistant - Automatic MQTT Discovery creates all sensors instantly. Just connect and it works.
- Complete Web Interface - Full device management from any browser. No apps or software installation required.
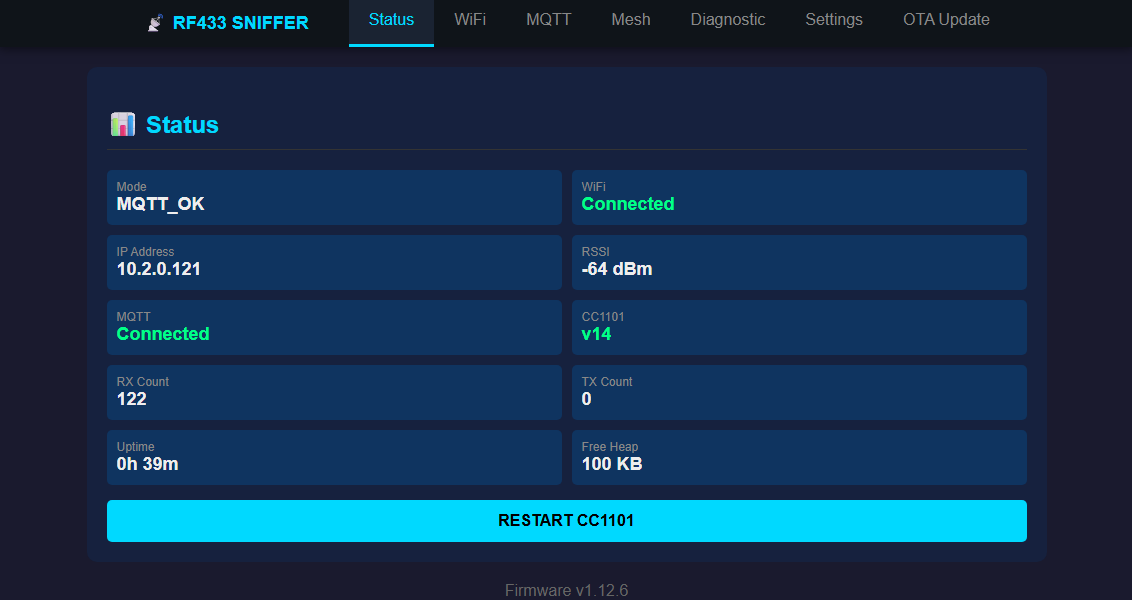
📊 Status Dashboard
The main monitoring screen provides a complete overview of your device at a glance. All information updates automatically every 5 seconds.
What You'll See
📡 Device Status
Operating Mode shows the current state: starting up, configuring WiFi, connecting, or fully operational with MQTT.
Uptime displays how long since last reboot - useful for monitoring stability.
Free Memory indicates available RAM for smooth operation.
📶 Network Status
WiFi shows connection status with green (connected) or red (disconnected) indicator.
IP Address is where you access the web interface from other devices.
Signal Strength (RSSI) shows WiFi quality: -30 is excellent, -70 is acceptable, below -80 may cause issues.
🔬 RF Module Status
CC1101 Status confirms the RF transceiver is working. Shows chip version (typically "v14") when OK.
Signal Counters track total received (RX) and transmitted (TX) RF signals since boot.
Restart Button reinitializes the RF module without rebooting the entire device.
🔬 Diagnostic Monitor
Real-time RF signal monitoring with detailed protocol analysis. This is where you see every signal your device captures.
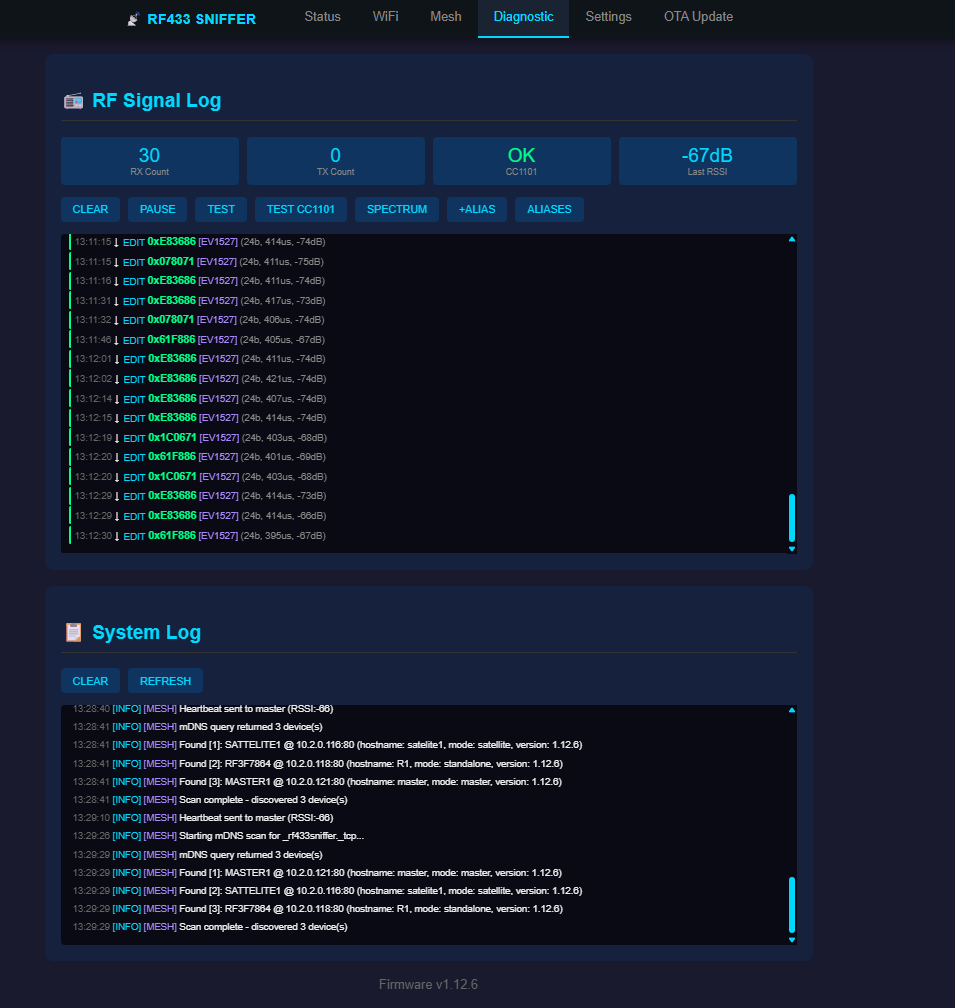
RF Signal Log
The scrolling log shows the last 100 RF signals with complete details:
- Time - Exact moment the signal was received
- Code - The RF code in hexadecimal format, or the alias name if you've assigned one
- Protocol - Detected protocol type: EV1527 (most common), PT2262, HT6P20, or RAW for unknown signals
- Parameters - Technical details: bit count, pulse width, signal strength in dBm
- Mesh Source - If running in mesh mode, shows which satellite device detected the signal
Quick Actions
- CLEAR - Empty the signal log to start fresh
- PAUSE/RESUME - Stop auto-refresh to analyze a specific signal in detail
- TEST - Inject a test signal to verify the system is working
- SPECTRUM - Open the RF spectrum analyzer (see below)
- ALIASES - Open alias management to name your RF codes
RAW Pulse Data
Click any signal entry marked with [+RAW] to expand and see the raw pulse timing data. This is useful for analyzing unknown protocols or debugging reception issues.
System Log
Below the RF log, you'll find system diagnostic messages with color-coded severity:
- INFO (cyan) - Normal operations like "WiFi connected" or "MQTT connected"
- WARN (orange) - Warnings that might need attention
- ERROR (red) - Problems that need to be fixed
🏷️ Alias Manager
Assign friendly names to RF codes so you can easily identify your devices. Instead of seeing "0x554FF0", see "Front Door Sensor" or "Garage Remote".
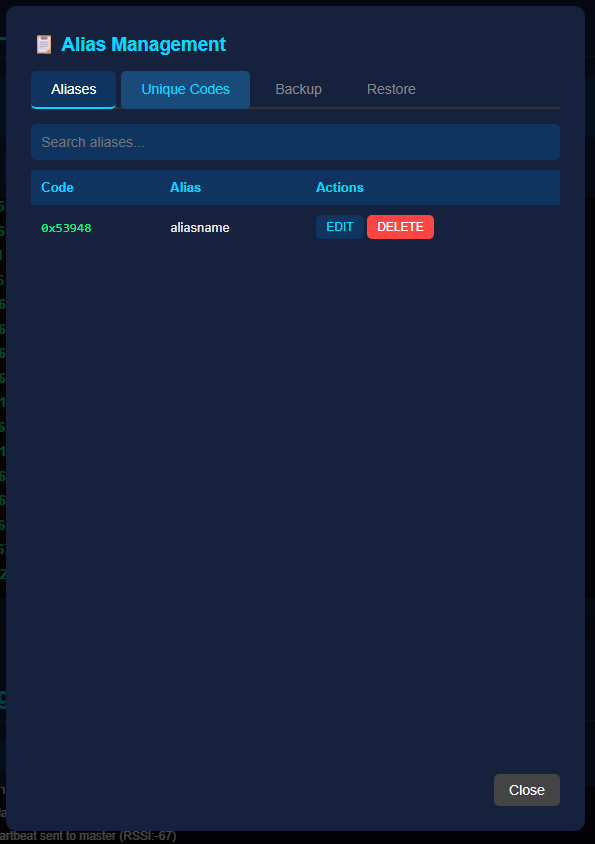
How Aliases Work
- You can save up to 255 aliases - enough for most homes
- Aliases appear in the RF log instead of raw codes, making identification instant
- Aliases are included in MQTT messages, so Home Assistant automations can use friendly names
- All aliases are saved to flash memory and survive reboots and power outages
Adding an Alias
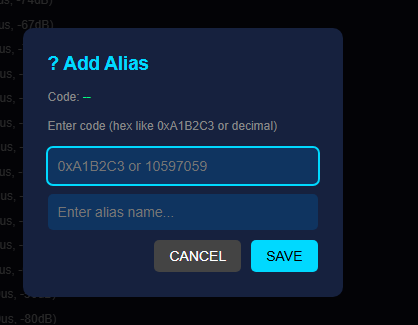
Two ways to add aliases:
- From RF Log: Click the EDIT button next to any signal entry - the code is automatically filled in
- Manual Entry: Click +ALIAS button and type the code in hex (0xA1B2C3) or decimal format
Unique Codes Discovery
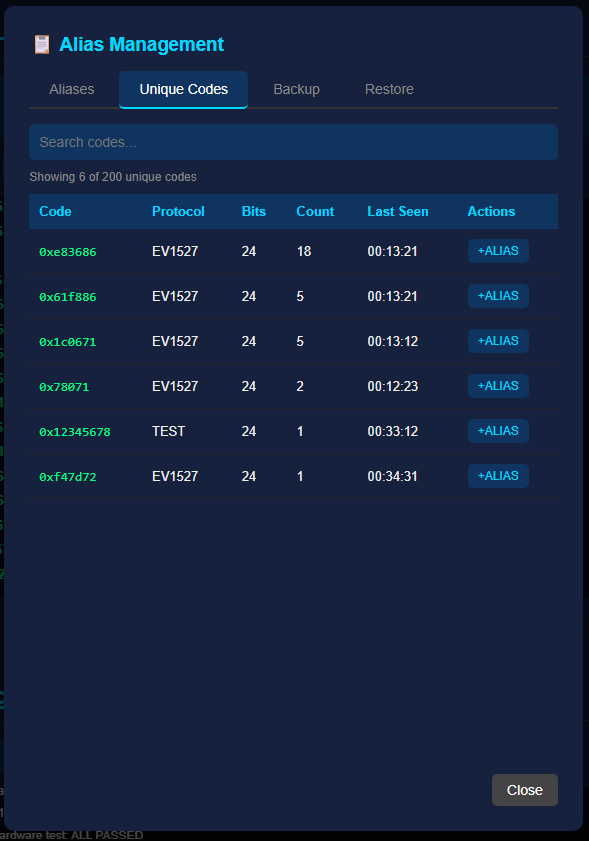
The device automatically tracks the latest configured unique RF codes (up to 200) and saves them to flash with counters. This helps you discover all RF devices in your environment:
- First Seen / Last Seen - When the code was first detected and most recently detected
- Count - How many times this code has been received - frequent codes are likely your own devices
- +ALIAS Button - One-click to create an alias for any discovered code
- Flash retention - The configured latest codes and counters survive reboots and power loss
Backup & Restore
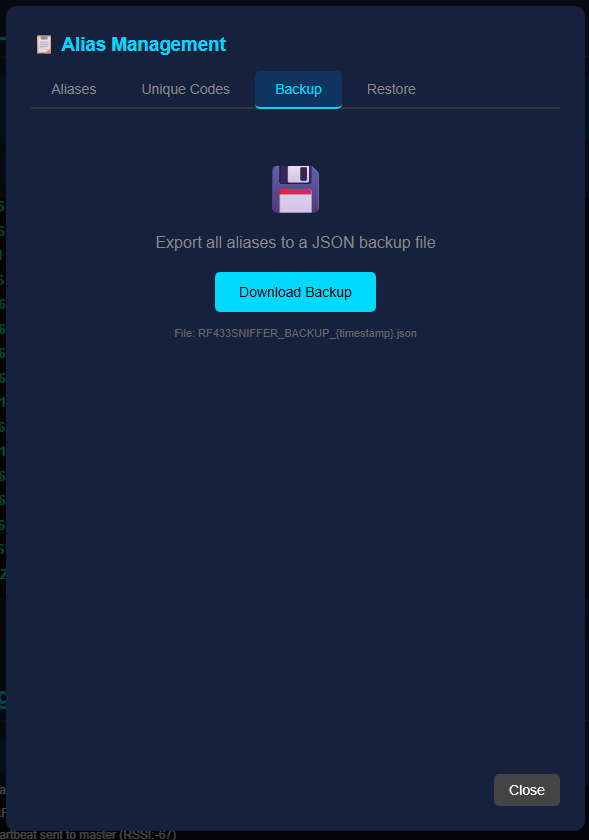
Backup - Download all aliases as a JSON file
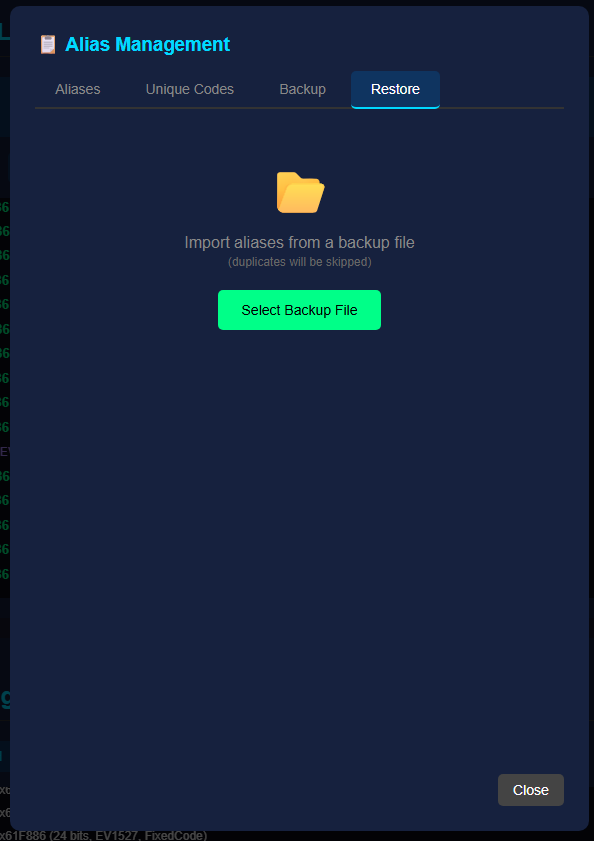
Restore - Import aliases from a backup file
Use backup before firmware updates or when migrating to a new device. The restore function automatically skips duplicates.
📊 RF Spectrum Analyzer
Visualize RF activity around 433MHz in real-time in a responsive professional modal with Current, Peak, Threshold, and Samples cards. Find interference sources and verify your antenna is working correctly.
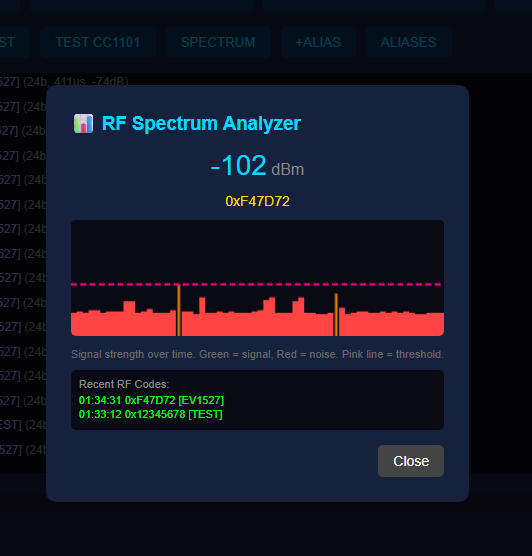
Understanding the Display
- Frequency Range - Default 433.00 to 434.00 MHz, adjustable to scan wider bands
- Color-Coded Bars - Green/yellow/orange/red bars distinguish strong signals from the noise floor
- Threshold Line - Pink line shows the configured RF noise threshold for quick tuning
Practical Uses
- Antenna Testing - Press your remote while watching the spectrum to verify signals are being received
- Interference Detection - Identify noise sources that might be affecting reception
- Range Testing - Move your transmitter around while monitoring signal strength
- Device Discovery - Find the exact frequency of unknown RF devices
🔬 CC1101 Hardware Diagnostics
Built-in hardware testing to verify the RF module is properly connected and configured. Run these tests if you're experiencing reception problems.
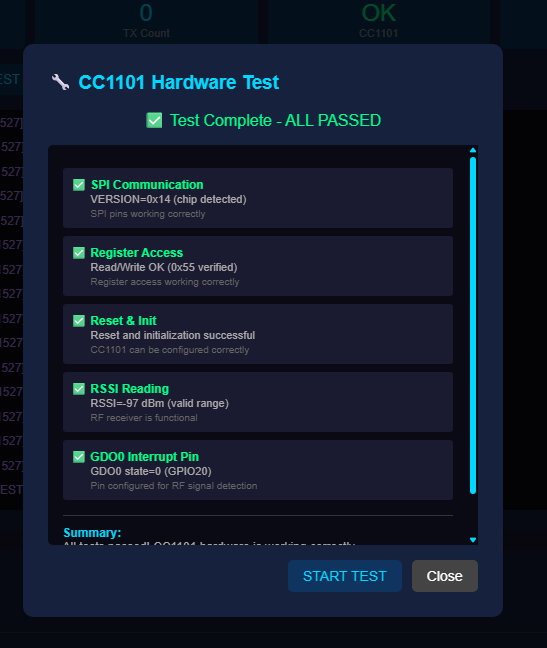
Test Results
- SPI Connection - Verifies the physical wiring between ESP32 and CC1101 module
- Chip Version - Shows CC1101 hardware revision (typically 0x14)
- Register Check - Confirms RF configuration is correctly applied
- RSSI Reading - Tests signal strength measurement functionality
All tests should show green checkmarks. Red X indicates a problem that needs attention - usually a wiring issue or power supply problem.
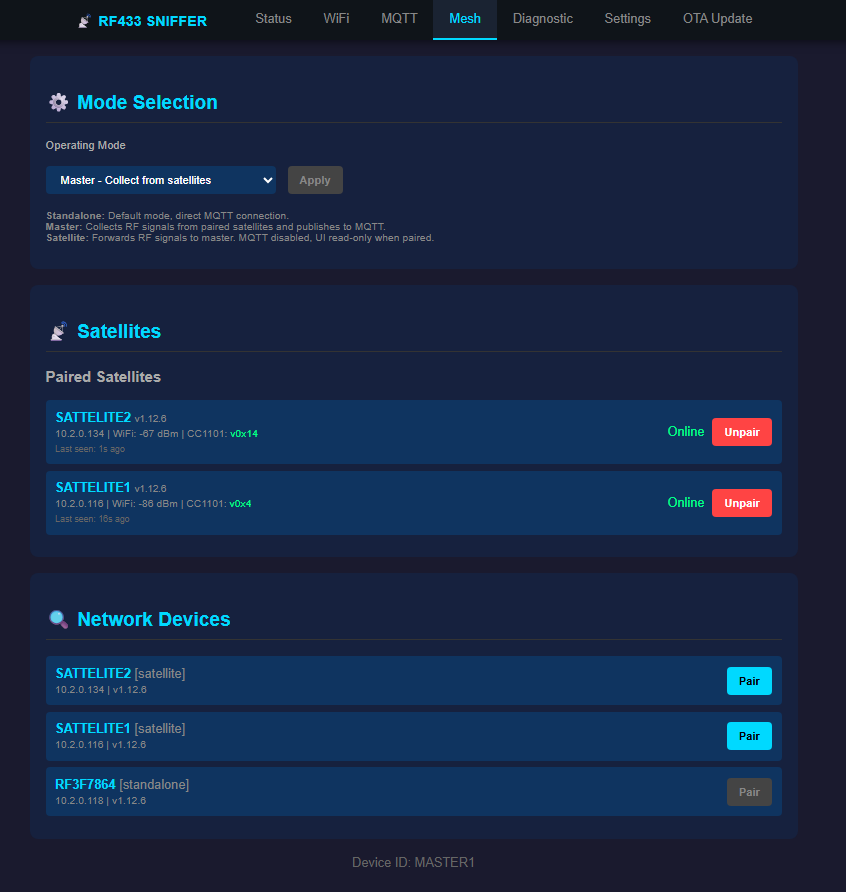
🔗 Mesh Network UNIQUE FEATURE
This is the standout feature that sets RF433-MQTT-SNIFFER apart from any other 433MHz receiver. Connect multiple devices in a Master-Satellite configuration to cover your entire property with a single unified system.
Why Mesh Matters for RF433
Traditional RF receivers only cover the area around them. One device in your basement can't hear a sensor on the second floor. With mesh networking, you place Satellite devices throughout your property, and they all forward signals to a single Master device. Your Home Assistant sees ONE device with complete coverage.
How It Works
🎯 Master Device
The central hub that receives signals from all Satellites. Only the Master connects to MQTT and Home Assistant. Place it wherever is convenient - it doesn't need to be centrally located.
📡 Satellite Devices
Remote sensors placed where RF coverage is needed. When a Satellite receives an RF signal, it immediately forwards it to the Master via WiFi. Typical response time under 100ms.
🔍 Auto-Discovery
The Scan function finds all RF433 devices on your network. Click "Pair" to instantly configure a device as a Satellite connected to your Master.
♻️ Smart Deduplication
If the same RF signal is received by multiple devices (common in overlapping areas), the Master automatically filters duplicates. Only one event reaches Home Assistant.
Deployment Example
- Basement: Master device (connected to Home Assistant server)
- Ground Floor: Satellite #1 covering entrance, garage, kitchen
- First Floor: Satellite #2 covering bedrooms and office
- Garage: Satellite #3 dedicated to vehicle remotes and outdoor sensors
Result: Complete RF coverage of a 3-story house with a single MQTT integration. No signal is missed regardless of where it originates.
Health Monitoring
The Master continuously monitors all Satellites:
- Heartbeat every 60 seconds confirms each Satellite is online
- If a Satellite goes offline, the Master sends an alert via MQTT
- Satellites automatically reconnect when network issues resolve
- Each signal includes source device ID so you know which Satellite detected it
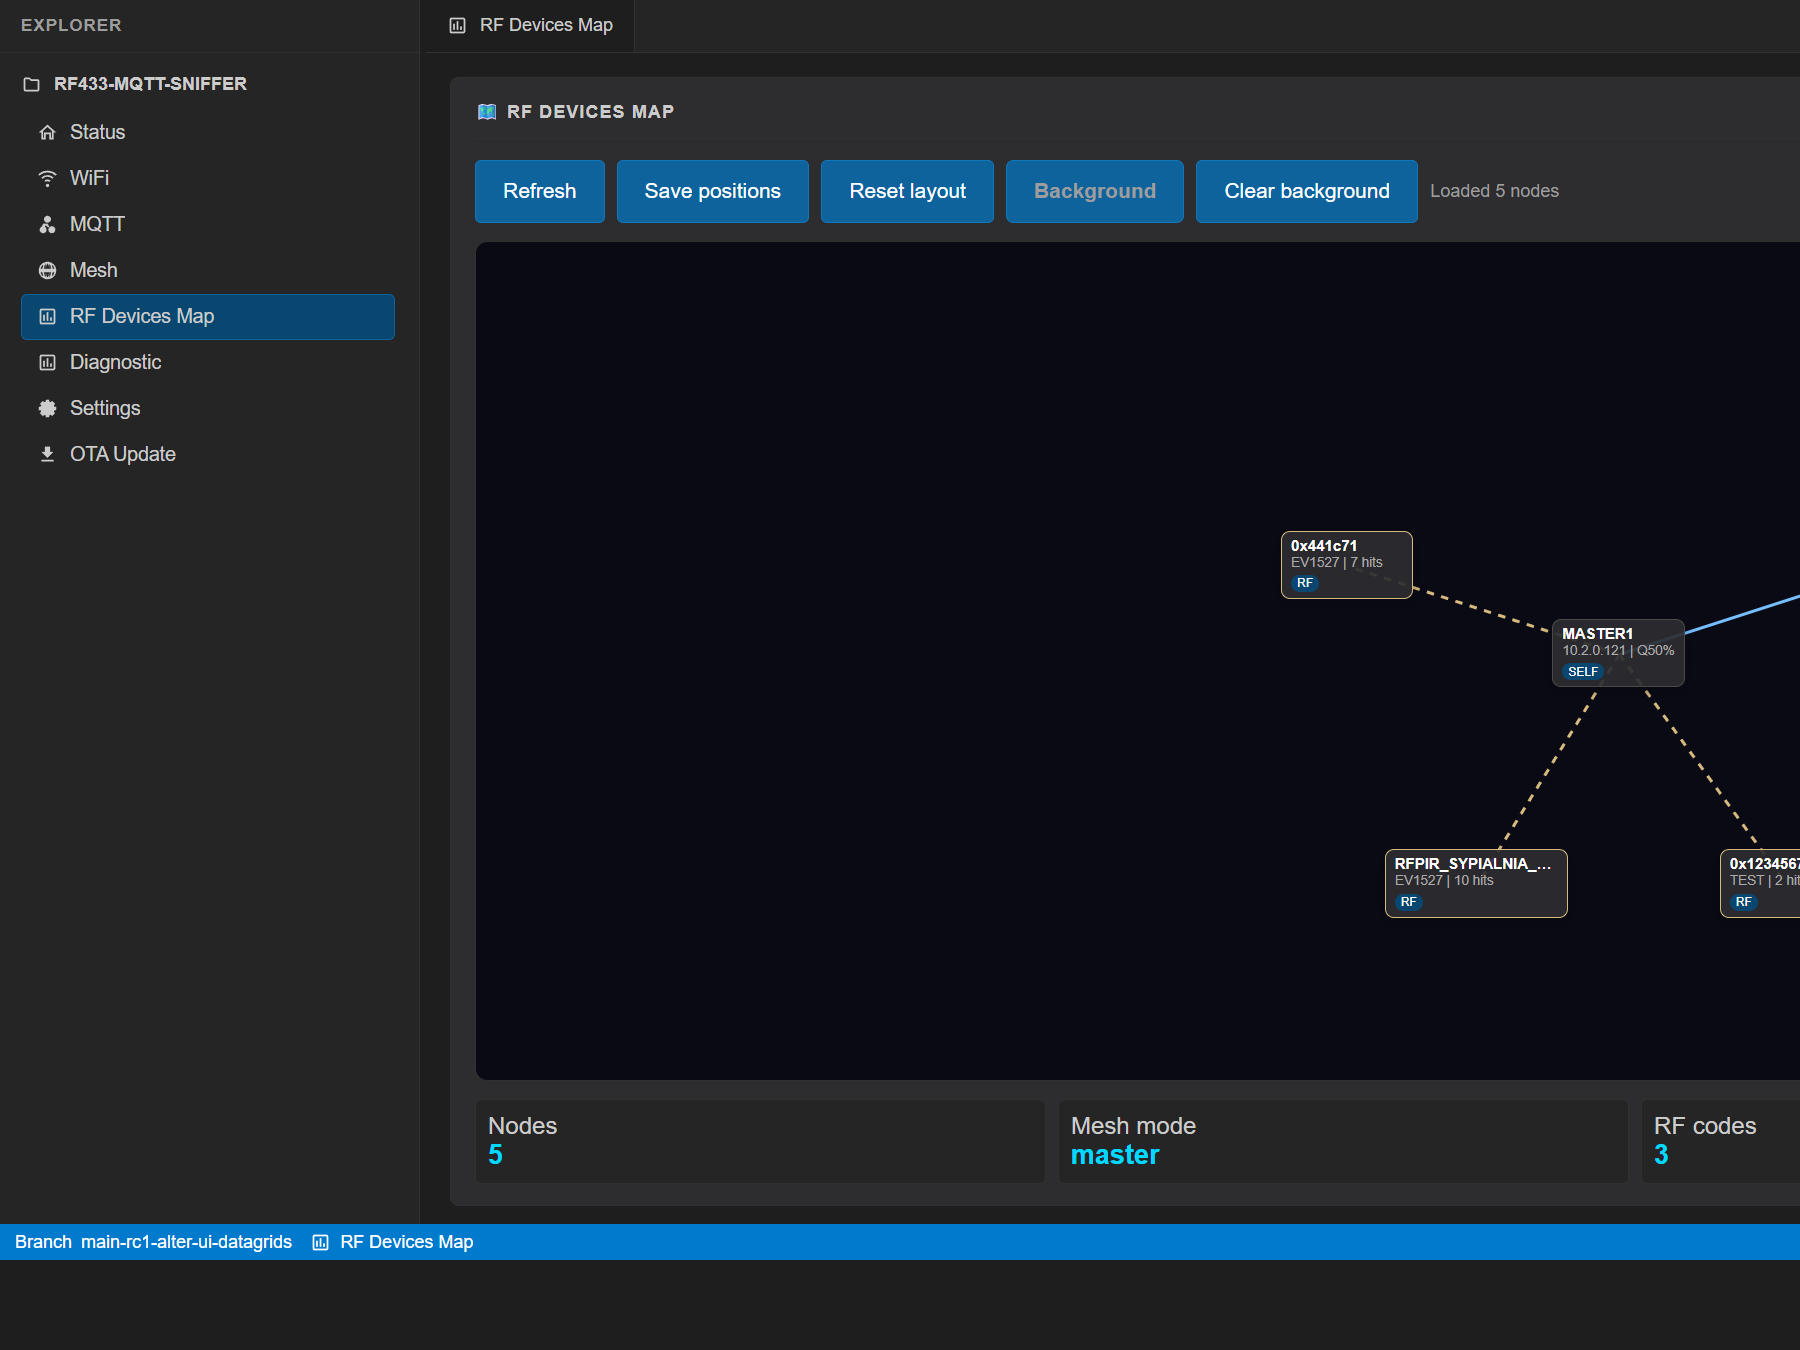
RF Devices Map
The compact map view shows the current device, paired master/satellites, learned RF codes, and short connection-quality labels in one draggable topology view. Node positions are saved in ESP32 flash, while the optional background image stays browser-local.
⚙️ Settings & Configuration
Complete device configuration through the web interface. All settings are saved to flash memory and persist across reboots.
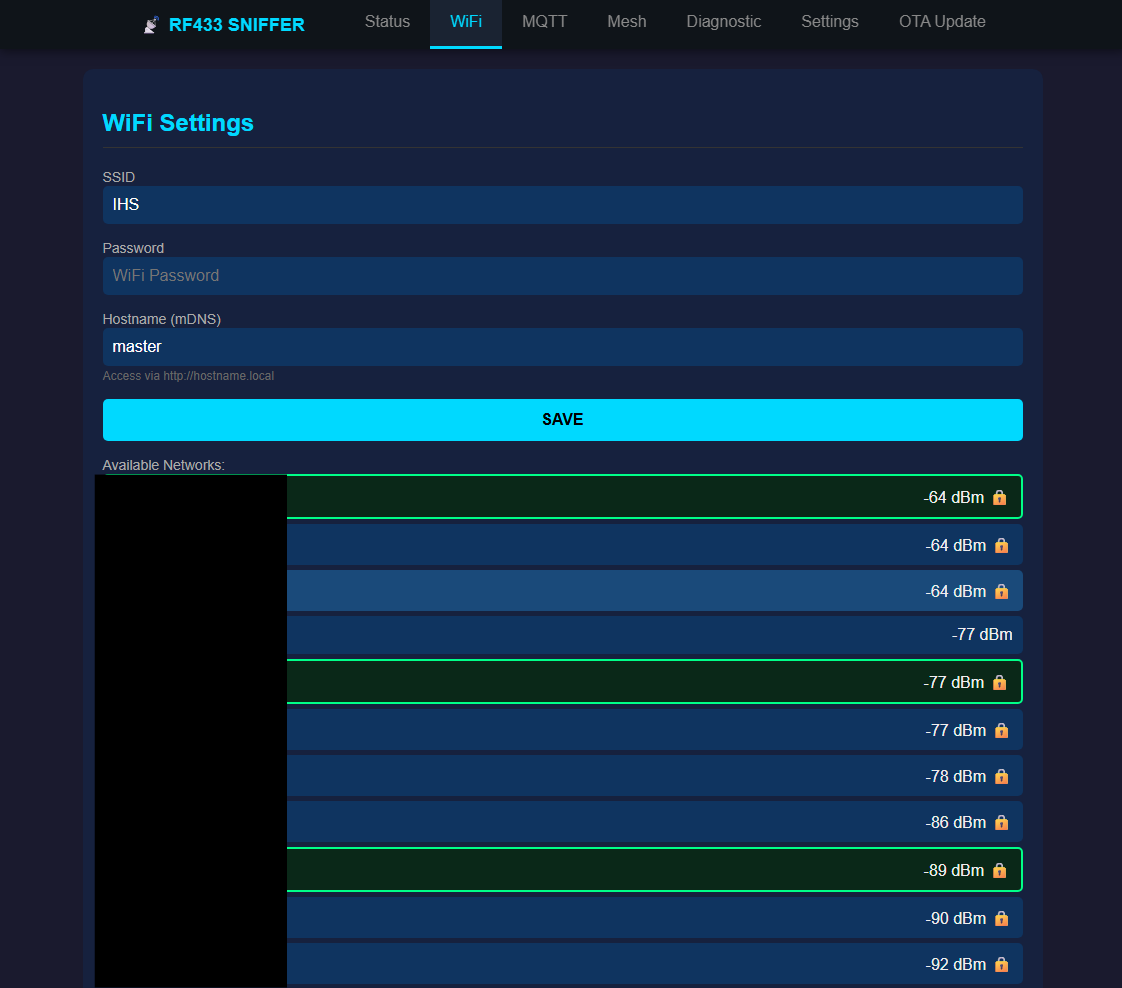
📶 WiFi Settings
Configure your network name (SSID) and password. Optionally set a static IP address if you prefer the device to always have the same address.
If WiFi connection fails, the device creates its own access point "RF433-Config" for recovery.
🔌 MQTT Settings
Enter your MQTT broker address (usually your Home Assistant IP). Configure username/password if your broker requires authentication.
Test Connection button verifies the broker is reachable before saving.
🔗 Mesh Settings
Choose operating mode: Standalone (single device), Master (hub), or Satellite (remote sensor).
For Satellites, enter the Master's IP address and assign a unique Device ID.
🏷️ Device Identity
Set a friendly device name that appears in Home Assistant and the web interface.
Configure timezone for correct timestamps in logs and MQTT messages.

🔄 Firmware Updates (OTA)
Update your device wirelessly without connecting any cables. New firmware versions add features and fix bugs.
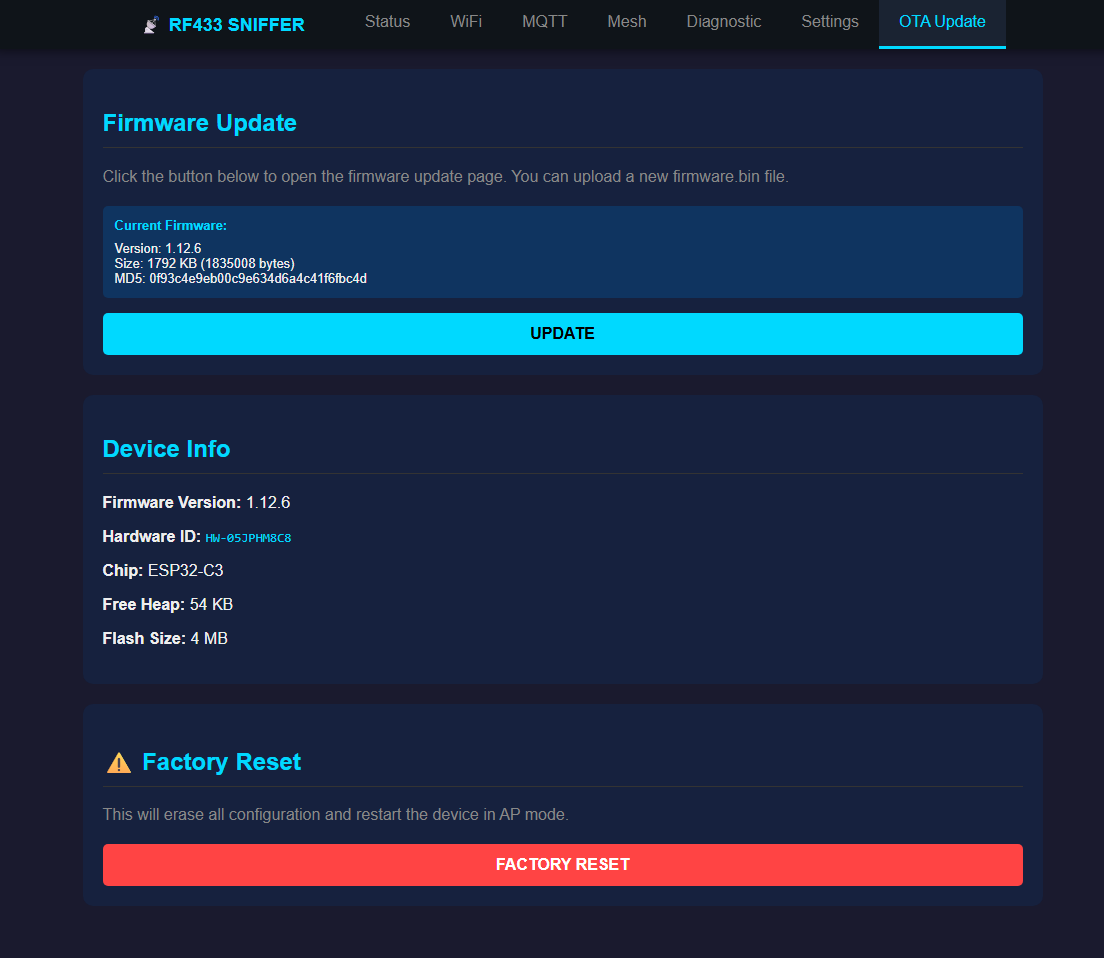
Update Process
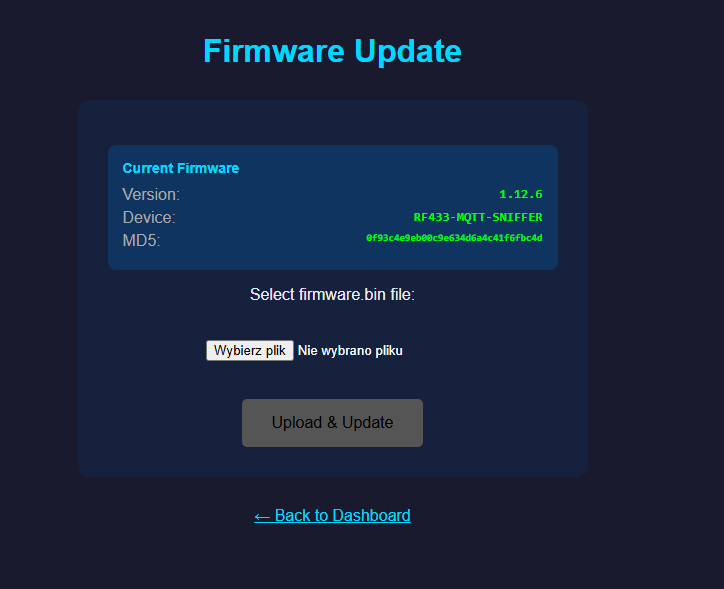
1. Select the firmware.bin file
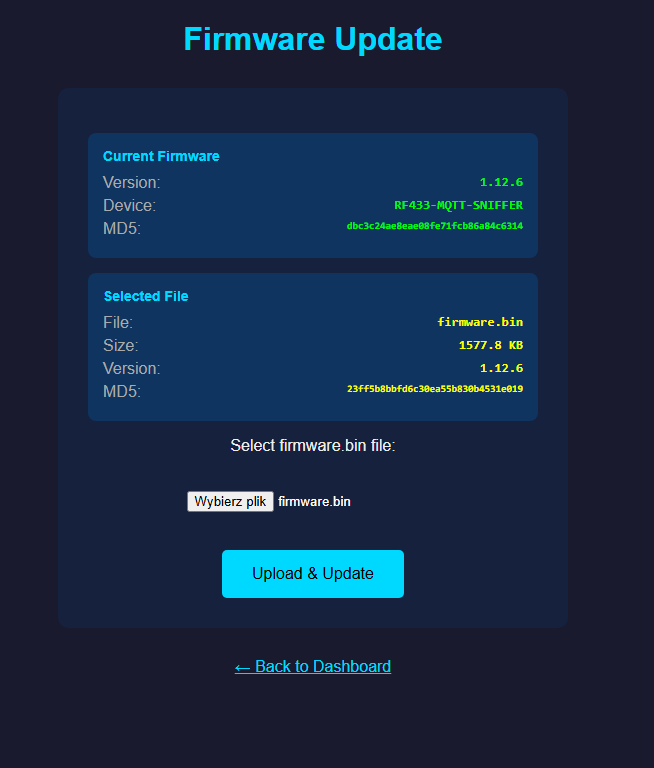
2. Watch the upload progress
Safety Features
- Dual Partition - The device keeps the old firmware until the new one is verified working
- Automatic Rollback - If new firmware fails to boot, the device automatically reverts to the previous version
- Settings Preserved - Your WiFi, MQTT, aliases, and other settings survive firmware updates
- Password Protected - Updates require authentication to prevent unauthorized changes
Best Practices
- Download firmware only from the official firmware download page
- Backup your aliases before major version updates
- Ensure stable WiFi signal during update (check RSSI above -70 dBm)
- Don't power off the device during upload - wait for automatic reboot
🏠 Home Assistant Integration
Zero-configuration integration with Home Assistant via MQTT Discovery. Just connect and all sensors appear automatically.
Automatic Discovery
When the device connects to your MQTT broker, it automatically announces itself to Home Assistant. Within seconds, you'll see:
- A new device in Settings → Devices & Services → MQTT
- Sensors for last RF code, signal strength, device status, and more
- Event entity that fires on every received RF signal
RF Signal Events
Every received RF signal triggers an event with complete information:
- code - The RF code in decimal and hexadecimal
- alias - Your custom name if one is assigned
- protocol - EV1527, PT2262, HT6P20, or RAW
- strength - Signal strength in dBm
- source - Which device (Master/Satellite) detected it
Automation Ideas
- Doorbell - Get phone notification when doorbell RF signal detected
- Motion Sensors - Turn on lights when PIR motion detector triggers
- Remote Control - Map RF remote buttons to Home Assistant scenes
- Security - Alert when unknown RF code detected (potential intruder testing)
- Presence Detection - Know when family members arrive (by their garage remote code)
💾 Data Storage
All your settings and data are permanently saved to flash memory. Nothing is lost when power is disconnected.
What's Saved
⚙️ Configuration
WiFi credentials, MQTT settings, mesh configuration, device name, timezone - all persisted.
🏷️ Aliases
Up to 255 RF code aliases with their names. Saved immediately after any change.
📜 Signal History
Last 100 RF signals preserved for review after reboot. Auto-refreshes on new signals.
🔢 Unique Codes
Configured latest unique RF codes with counters and timestamps, saved in flash.
Factory Reset
If you need to start fresh, hold the BOOT button for 10 seconds. This erases all settings and returns the device to factory defaults. The device will create an access point for initial configuration.